
Showing posts with label Free patterns. Show all posts
Showing posts with label Free patterns. Show all posts
Saturday, 4 October 2014
Free Poppy Pattern
For a really beautiful (and FREE!) poppy pattern with photos click here. In fact this whole blog is really cute, so definitely take a look around!
Monday, 5 May 2014
A Sunhat for Sophie
I finished this little Crochet sun hat for my little poppet Sophie in no time at all. It was a really quick easy pattern that you can find for free here.
It is a lovely hat that could be made in any colour with any detail. I just threaded some wool through the hat and sewed on a little crocheted bow in the same colour. I made it in cotton as the pattern suggests, which made it light enough to protect sensitive baby heads from the summer sun, without it making your baby too hot.


Sunday, 4 May 2014
The Cutest Baby Sun Hats
On the 11th of the 11th I gave birth to our first child. A beautiful baby girl. Now summer is here I want me and her to spend every minute possible out in the fresh air, on lush daisy-sprawled lawns, with friends and toys and ice-cream (for me!). So, of course, I need to keep her delicate skin protected from the sun. Most importantly I want to protect her head, so (any excuse) I browsed pinterest for inspiration and spotted a few cute little designs that I couldn't resist...
1. The floppy sun hat.
From here.
I LOVE this pattern. It is really easy to do, took me less than a day (quite an achievement with a six month old), and looks really very cute - the perfect timeless sun hat for a boy or a girl.
 |
| Pictures and pattern are thanks to Yolanda Soto-Lopez of All Crafts Channel |
Here you can see my own version of this sunny little number.
2. The crocheted turban.
From here.
I haven't tried this yet but can't wait to have a go for my little munchkin. Think she will look adorable in this.
.
 |
| This beautiful pic & pattern are thanks to one clever mama at This Mama Makes Stuff |
Sunday, 7 July 2013
Crocheted Roses
Learning something new

Today I taught myself how to crochet a rose. I wanted to make some to add as a detail on my baby headbands.

The Pattern
I looked at a lot of different free rose patterns on Crochet Pattern Central and then I adapted the patterns to suit my needs. I like thinks to look neat and delicate, but I need them to be fairly quick to crochet so that I can sell my crocheted accessories for a reasonable price that is affordable to the customer without having taken me houra of unpaid labour. The pattern I settled with is a variation on this one.
Saturday, 1 June 2013
Super-cute Crocheted Pin Cushions
Look at these crazily cute crocheted takes on the traditional pin cushion. Aren't they just the most adorable things!?!
Follow the links at the bottom of the pictures to see them in their original context. (The first one has a free pattern so you can have a go!)
 |
| Free pattern available on amigurumipatterns |
 |
| By Doni at Whiskers & Wool |
 |
| By Becky Oh at Eightlegs |
I stumbled across these lovelies on pinterest. To see more of my pins click here.
Tuesday, 28 May 2013
Crocheting a business card case
I am part way through a really simple little project, where I am effectively crocheting a little sock to fit around my business cards so that they can stay nice and shiny even despite being in the bottom of my handbag all day every day.
Here's what I did;
*Crochet a chain twice as long as the business card is wide.
*Add a few chains if you want to fit a good number of cards in there.
*Slip stitch into a ring.
*Double crochet in every chain.
*Work round and round and round in double crochet stitches until it is long enough.
*Sew or crochet one end together to creat the bottom of the case.
*decorate to your liking
Voila


Thursday, 6 December 2012
Ten Free Crochet Christmas Projects
I've been rummaging through the interweb, and have stumbled across some really fun and festive crochet projects. Here are my top ten FREE patterns on the web for the holiday season, in no particular order.
Enjoy :)
Enjoy :)
1. The reason for the season
by Cat Carlisle at craftycattery.com, she has also done free patterns of an Angel to put with these three. So cute...
 |
| check out the free paterns here |
2. A Yummy Candy Cain
by Doni at 'whiskersandwool'
 |
| click here for the free pattern. |
3. Sweet Amigurumi Christmas Lights Garland
by 'Dapper Toad'. You will need to log in/sign up to Craftsy or Ravelry to access this free pattern. |
| to have a look click here. |
4. A Little Santa hat
by 'Homemade Zen'. This project is just so simple and cute. |
| click here for the free pattern. |
5. A Festive iPhone Snug
by a 'decoratingandcookingforchristmas' website and would make a perfect Christmas gift. Don't you think? |
| get the free pattern here |
6. A Quirky Turkey
by Teri Crews. Again, you will need to log in/sign up to Craftsy or Ravelry to access this free pattern.
 |
| take a closer look here |
7. A delicate snowflake
by 'FabAct'. There are hundreds of snowflake patterns online. For a choice of just 21 pretty (and free) patterns try this site. |
| go to this page and click on the snowflake you like |
8. Silly Santa Hat With Beard
by 'red heart'. Not the cutest pic I ever posted but is sure to cause a giggle or two when you visit family for Christmas.
 |
| get your free pattern here |
9. A Versatile Bauble Pattern
by Catherine Hirst. This could be made in whatever colour you like, or strung onto a garland. Lovely... |
| click here for the free pattern. |
10. A Crocheted Pudding
by June Gilbank of 'JunePlanet'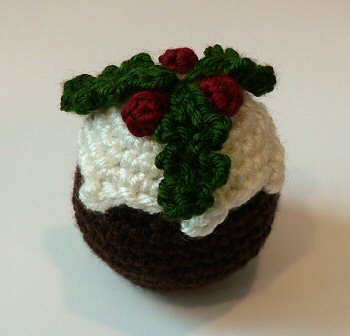
Wednesday, 5 December 2012
Crocheted little bow
I have just found the cutest, easiest, little crochet bow tutorial on YouTube.
This is nothing to do with me but it is thanks to queen of crochet "Bobwilson123" (who you can search for on YouTube, Twitter and Facebook, so take your pick.)
Grab a hook and a scrap of wool right now and crochet along with this video. You will love how easy it is.
Enjoy.
This is nothing to do with me but it is thanks to queen of crochet "Bobwilson123" (who you can search for on YouTube, Twitter and Facebook, so take your pick.)
Grab a hook and a scrap of wool right now and crochet along with this video. You will love how easy it is.
Enjoy.
Thursday, 22 November 2012
Crochet Leaf

This crochet leaf is the perfect addition to any crochet flower and is very simple. I made up the pattern myself but I am sure there are many leaf patterns out there on the great big interweb if you would like something a little more complex.

To make a longer leaf you simply begin with a longer chain. I have experimented with a few different lengths and I think seven gives a really cute size without it being too fiddly.
You will need

- 3mm hook
- Green wool
- A yarn needle
- some scissors
The Pattern
1. Chain seven.
2. double crochet into the second chain from the hook.

3. treble crochet down the chain stopping on the penultimate stitch, so you have one single stitch left in the chain.

4. double crochet five times into the final stitch, this will force your stitches into a curve to create the rounded bottom of your leaf. (Cheeky!)

Here, you may want to tuck the yarn tail
between your fingers and the leaf,
as it can get in the way.

5. now treble crochet all the way up the other side of the chain, again stopping at the penultimate stitch.

6. double crochet into the final chain. Your leaf should be looking very leaf-shaped by now.

7. Take some scissors and snip your leaf free from your ball of yarn.

8. do a final slip stitch to finish off your leaf with a tight point.

Your leaf is now complete...

If you are not sure how to darn in the tails, click here.
Monday, 19 November 2012
Triple layered flower pattern
Here are the finished triple layered flowers ready to use on Jenny's headband...

My pattern
I used a 2mm hook, a 4mm hook and a 6mm hook to create the three different sized flowers.Chain 8.
Slip stitch into first chain to form a ring.
**Chain 2, 3 treble crochet into ring, chain 2, slip stitch into ring**
Do that bit in stars 5 times for 5 petals.
Fasten off and darn in the tails.
Sew layers together.
Finish with a button.
Sunday, 18 November 2012
Chunky Winter Headband Pattern
With Christmas upon us I have been eager to teach myself to crochet really chunky headbands as Christmas prezzys. What with it being winter I decided the chunkier the better. This is the pattern I have decided to use after much interweb trawling.
It is cute because it is chunky and the pattern is very versatile.
The ties are a fab idea as they make the headband less bulky under the hair and make it adjustable to different sizes. Useful for a Christams prezzy. Don't you think? I probably won't follow the pattern exactly but I will definitely this to get me started...
You will need - 40 g any worsted weight yarn - 4mm hook - Yarn needle
Gauge - Approx. 4 stitches per inch - Approx. 4 rows per inch
The Pattern
Chain 4
Increase
Row 1: sc in 2nd ch and across, ch 1, turn
Row 2: (2 sc) in 1st st, sc 1, (2 sc) in last ch, ch 1, turn
Row 3: sc across, ch 1, turn
Row 4: (2 sc) in 1st st, sc to next to last st, (2 sc) in last st, ch 1, turn
Repeat Rows 3 and 4 until you have 13 stitches. Work one row of plain sc, ch 1, turn. Now you are ready to begin your pattern. Feel free to insert any stitch pattern.
Main body of headband
(You could use any stitch you want to for this part of the headband but I think this looks nice and solid)
dc in first stitch, *skip 1 stitch, work (sc, dc) in next stitch; repeat from * repeat starred instruction until there are two stitches remaining. Skip 1 stitch, sc in the turning chain of the previous row, ch 1, turn
Repeat that sequence until it reaches approximately 12 inches from the start of your pattern (do not count the sc)
Note: If your stitch is particularly stretchy (like sc rib), you may want to work less than 12 inches. It would be a shame to have a floppy headband that looses its shape! If your stitch doesn't stretch much, you may want more, depending on the size of your head.
When you finish that main body of your headband decrease as follows.
Decrease
Row 1 (of decreases): Sc dec 2 st, sc to last 2 st, sc dec, ch 1, turn
Row 2: sc across, ch 1, turn
Repeat these Rows 1 and 2 until you have 3 stitches remaining. Now you are ready to do the sc border and ties.
Single crochet around the edge, and ties
(You may find it easier to read the entire next section before you begin!)
Ch 1, sc around the headband.
Sc 3 in corners.
When you reach the 3 sc at each end, sc in 1st 2 stitches, then ch approx 7 inches.
Slip stitch in 2nd ch and across.
When you reach the base, sc in the 2nd ch again, then continue around.
When you get back to where you started, join to the first sc with a slip stitch.
You may want to sc once more for extra stability.
Fasten off and darn in ends.
And finally
Wear your headband and feel more than just a little bit fabulous!
Hope you enjoy making and wearing this item!
I originally took this pattern from here but then I did rewrite parts of it so that I would find it easier to follow. The pattern was originally put on-line with a creaive commons license.
Subscribe to:
Comments (Atom)